PORTLAND, OREGON Despite forecasts of record high temperatures for early September, local sewist Erin McKean declared the dress she finished on Labor Day to the be the last “summer dress” of 2024.
The dress, another iteration of the “Isca” pattern that McKean has been sewing all year, was made in a lightweight Liberty Tana lawn featuring a pattern of little fish. “I don’t remember I where I bought this fabric,” McKean admitted. “Or when. But I did a reverse-image search and the pattern is called ‘Glimmer’.”
Instead of the stand collar of the original pattern, McKean chose to make this iteration without the collar, finishing the neckline with bias binding. “More summery,” she said. “Although it would have been better if I’d remembered to lower the neckline by about a half-inch.”
McKean also replaced the original set-in full sleeves with self-lined cap sleeves, a consistent change for her versions of this pattern. “This time I changed the inner finishing to a slip-stitch, rather than bias-binding the seam.”
McKean is a vocal proponent of pockets, no matter the season. Her dress pockets can carry several pounds of her belongings, in a pinch. “Once, in an airport, I had a full-size insulated water bottle in one pocket and a sub sandwich in the other, plus all my normal stuff—wallet, notebook, phone, handkerchief, lip balm, pen …” The pocket facings are also piped. “I don’t remember the last time I didn’t add piping to a pocket facing.”
Although she had originally planned to sew a few more dresses during summer 2024, including several in fabrics that had originally been intended for the summers of 2017-2023, McKean said she was generally pleased with the amount and variety of sewing she had been able to accomplish over the last few months. “I made a multiple-gingham Isca, and a linen stripe Isca, and a checkerboard plaid Isca. And a couple more that I haven’t taken pictures of yet.”
When asked about her autumn sewing plans, McKean produced a scrap paper list on which the words ‘printed corduroy’ and ‘plaid brushed flannel’ were prominent. “I do plan to sew mostly from my stash between now and the end of the year,” she said. “But no promises.”
Early last year I claimed that 2023 was going to be ‘the year of the shirtdress’ and, for once, I was right.
The biggest winner in the shirtdress sweepstakes (prize: Erin makes a lot of you) was the Isca dress from Marilla Walker, which I made a dozen times:
The first iteration (blog post)Round two.Round three (blog post). This is where I began replacing the set-in sleeves with a kind of modified cap sleeve.
After those three, they kind of came in a rush:
Heavy rainbow chambray. This almost certainly came from Stonemountain.Liberty Tana lawn.I think I bought this lawn from Stonemountain? I’m bad at dress selfies but I made an attempt for this one in a hotel in Copenhagen.More Liberty, this time a little longer for autumn/winter wear. (The buttons are little flowers too.)This one is probably my favorite? I have no idea where I got this fabric, it’s a light poplin or maybe a heavyish quilting cotton. Another Liberty print, this time, poplin, and again in the longer length. The piping is a very candy pink that I think goes well with the 80s-esque splatter print.This is a warm and cosy faux bois flannel I bought from Josephine’s and sewed up the very next week. The buttons on this are very nice.Another warm flannel version (I just wear a long-sleeve tee underneath to make those little sleeves wintery).This was going to be my Plaidurday dress for this year but I didn’t quite finish it in time. It’s a plaid with a floral overlay, again in the longer “wear it with knee socks for autumn” length. The buttonholes are done in the same(… ish) red as the flowers.
Did I have time to sew anything else, you might ask? Well, yes. I also made two (and a half) of the Matilda shirtdresses:
A blue paisley Liberty lawn (blog post).I’m not entirely sure I made this one in 2023; it might have been a late 2022 entry. I left the collar off this one but forgot to reduce the collar stand/band. That, combined with the stiffness of this fabric, basically makes me look as if I should be saying “Yes, Lord Vader—immediately, Lord Vader!” every time I’m wearing it. This dress is going to have to wait until spring for me to finish it; I bought the fabric in Korea, realized I didn’t have enough, faffed around to try to find a coordinating solid Kona cotton, finally got it and cut out the pockets, piping, sleeve bands, button bands, and collar, and then lost all interest. I’m sure at some point I will get motivated to find tiny teal cherry buttons, but until then it will probably live in the UFO pile.
I also made two of my favorite Farrow jumpers, one at the beginning of 2023 and one a few weeks ago, both in basically the same color.
This is a nice piece of wool that I’m pretty sure I bought at Vogue Fabrics in Evanston in the 90s? It only goes to show that you should never, ever, get rid of any fabric, ever. Someday the right project will come and wake it from its slumber. (It’s not so grabby around the hips when it’s being worn; my dress form is fuzzy and I am not.)This is in that nice Kaufman Shetland speckle flannel. I love this style for winter; I wear it over a t-shirt and with ankle-length leggings and boots.
The most challenging thing I made this year was absolutely the Hove jacket from In The Folds:
You can see a bit of the bobbly stitching on the zipper at the bottom. All the seams are bias-bound! I underestimated the amount of fabric needed and had to reorder halfway through! All I can say is, my vast vocabulary of epithets and interjections really came in handy during this project. However, I wear it basically EVERY DAY, so it was worth it. And there’s some heavier wool fabric and reflective piping waiting on my sewing table right now for round two … gonna do a button band or snap closure for the next one (or maybe even toggles!) though.
The other thing I made in 2023 and use almost every day (and which gets the most comments of anything I wear, by far) is this project:
I bought the “You Can Always Quit” t-shirt from the Today in Tabs newsletter, but (surprising nobody) I am not a puffy-paint t-shirt wearer. It sulked in my sewing room until I bought a cheap black canvas crossbody bag from Amazon. Then I cut out the logo and just zig-zagged it onto the bag.
Absent on picture day: the Peppermint Pocket Skirt in black and white gingham seersucker (which I’ve actually not even worn yet); a complete failure of a shirtdress that will have to be broken down for parts (but might be tried again in a different fabric and/or size); an attempt at the Tilly and the Buttons Zadie dress in ponte (I made a mistake and ripping stitches in ponte is the ABSOLUTE WORST).
Which one do you like the most? (Pass over the ones you don’t like in silence.)
I’m excessively pleased with this new variation of the Isca shirtdress. This is my third iteration (see #1, #2). The biggest change from the last version is that I swapped out the sleeves for a band sleeve (following Gertie’s great instructions) and somehow it lightens the whole mood? I made the band sleeves about 3 inches wide at the top which takes them darn near to flutter-sleeve territory, but not quite.
The fabric is Nani Iro Grace, in a linen/cotton—I don’t think it’s available any longer, but you can still get a few colorways of the gauze, which I’ve sewn with as well.
Don’t get me wrong—just because I’ve made a lot of changes (collar, sleeves, pockets …) to this pattern doesn’t mean I don’t think it’s a good pattern! It just means that I have very particular tastes. I like to think of these variations like a cover song. If it’s done right, it brings something to the original without taking anything essential away.
I’ve already picked out the fabric for the next round, it’s a rainbow stripe. I will probably change the armscye a bit to move it in at the top of the shoulder and up underneath the arm, but otherwise I’m pretty happy with my cover version!
This is Simplicity 7512, which I’ve probably bought three copies of in various sizes, and then never made any of them because I disliked the way the skirt was put together. But then I realized that I could just … change that, and so behold my preferred pockets:
Here’s the pocket with a big ol’ ruler in it, for scale:
Here’s the zipper view; I actually couldn’t remember the last time I put in an invisible zipper:
I was a bit distracted and completely forgot to do my usual collar adjustment (based on the Fashion Incubator method) but it turned out mostly okay. (Tana lawn forgives a lot.)
For some reason I thought I’d bought this Liberty from The Fabric Store but maybe not? I don’t see anything in my receipts folder. I’m convinced it’s Liberty, but a quick image search doesn’t turn up anything.
I haven’t worn this a full day yet, but I could barely bring myself to take it off after I did the final try-on … it’s just delightfully comfortable. I don’t remember similarversions I’ve made before being as comfortable?
The other thing I like about this dress is that I’ve loved this style for … oh, since about I knew it existed. I bought a similar dress (a “Villager” knockoff) at the old Maxwell Street flea market in Chicago, in what probably was the last year there even was a Maxwell Street market. It was hanging on a chain-link fence, between vendors selling (what I now realize were probably stolen) tools and packs and packs of white tube socks. I wore it nearly to death, despite it being absolutely not sufficiently warm for Chicago nine months of the year (and despite it having no pockets).
When I first started wearing this style there was at least a little irony involved—I was a young person, wearing an old person’s dress. Now I am an old(er) person, still wearing the same dress (albeit with larger dimensions all around), and the irony has … evaporated? Depleted? Perhaps irony has a half-life, like radioactivity? I am looking for other examples of “irony depletion”, if you have them; not the phenomenon in which someone pretends to be something and then becomes that thing, but examples where time bridges an ironic distance. Maybe when punk bands play a cover of some easy-listening 70s tune and now, whoops, it’s almost 50 years later and now it’s their well-loved classic? Stuff like that. Anyway, you know where the comments are, have at it.
I’m gonna make this dress a LOT, I can feel it. Brace yourselves!
Before the holidays I did a wearable muslin of the Marilla Walker Isca shirtdress. I had very high hopes—the reviews were good, the diagonal bodice line had me dreaming of stripey wonders, and, of course, pockets!
I made it up in some nice brushed blue/black check shirting (no idea where this fabric came from, I feel like I’ve had it forever). The directions were excellent, especially given the unusual shoulder construction, and the fit was pretty good. The only alteration I made was to change the pointed collar to a rounded one.
The only problem was the pockets were too shallow. I kept losing things out of them when I sat down. Now, I don’t have very many requirements for pockets, but one hard and fast rule I do have is that things need to stay in them until I take them out.
Obviously I could just fix it in round two, but I really didn’t want to give up on the muslin, which had turned out more on the ‘wearable’ side than the ‘muslin’ side. But I didn’t have enough fabric to recut the front skirt (nor did I have enough ‘want to do it’ to recut the front skirt).
I did, however, have enough fabric to cut a few bias bands and enough ‘want to do it’ to undo just enough of the waist and side seams to shove them in:
The inner piping is where the original pocket edge ended; I sewed the new strip to the pocket edge (sewing in the ditch of the piping), then attached piping to the raw edge of the new strip. I used a strip of black hem facing tape to finish the inside of the bias strip (because I didn’t have enough of the check fabric to do so).
Here’s a closer view (the inner piping is fatter than the outer piping because, uh, things that are closer look bigger and also because I ran out of that size of piping cord):
And one with an iPad mini in it, for scale:
I also shortened the skirt by about three inches (did I unpick the original foldover hem and then redo it? Ha, no, I just folded it up and sewed it down, as my reserves of ‘want to do it’ were running quite low at this point).
The only other thing I wish I had enough fabric to change are the sleeves: I feel like that diagonal line of the bodice would be really cool if it extended to a little cap sleeve. I looked at a bunch of “draft a cap sleeve” instructions but … not enough fabric, and even my spiffy new LIGHT UP SEAM RIPPER didn’t inspire me to take off these (perfectly serviceable) set-in sleeves and see if I could recut them into caps.
I have some (lol “some” I have ENORMOUS QUANTITIES) of stripey fabric that I think will be good for the next round. There are a couple more projects in the queue before I will get there, but in the meantime, I can now wear this one!
“Yes, Erin, we’ve heard this before,” you say, and you’d be right—I don’t want to go back and search, but I’m pretty sure I’ve declared several previous Years of the Shirtdress, and then made … one. If that.
This time, though … that above is my third Matilda shirtdress, and I’m planning on making quite a few more. I actually bought the original non-curve-sized Matilda pattern yonks ago, realized how much work it was going to be to curvenize it (that’s the technical term), and it promptly went to the bottom of the pile. So when the curve version came out I was pretty enthusiastic, and the pile got shuffled somewhat.
I’ve since made it three times; this is the latest iteration. I will post the other two anon, but I wanted to get this posted sooner, because … well, I like it!
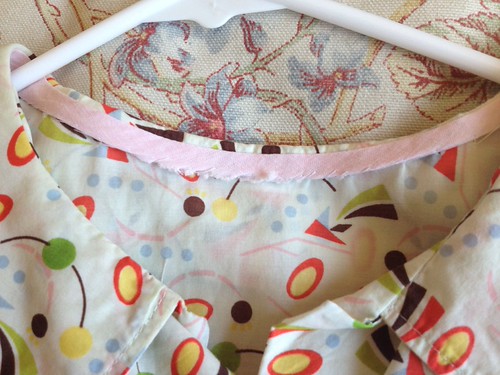
It’s not perfect by any means; the collar is a bit wonky on the left-hand edge (I might be able to just re-press it tho):
I like lots of things about this pattern: first off, the pockets are a good size, and patch pockets so very easy. The sleeve bands are fun, too:
I’m looking forward to really playing around with stripes and plaids next, because this pattern goes together really well.
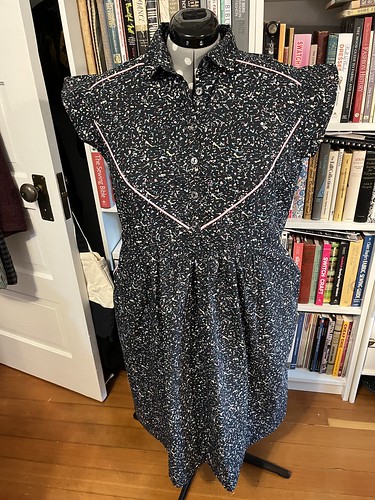
There were some changes made: I had to raise the bust point a bit (but the pattern designer actually has a great tutorial for this). I think the collar stand is too tall, so I shortened it (and I might narrow the collar, too). I’d love to try this with a flat (Peter Pan) collar, but I haven’t wrapped my mind around that change yet. I also did the waistband buttonholes horizontally, instead of vertically, because that just feels better? Idk. Because this fabric is lightweight, I used hem binding instead of the ‘fold twice and sew’ method because I wanted a little extra weight. Next go-round I’m going to only use this (very good) fusible interfacing for the collar stand and front bands, and use organza for the waistband and the collar.
The pattern instructions want you to sew the bands to the front, flip them to the back, and then topstitch, but I am not nearly patient enough for that nonsense, so I did it the opposite way around. (This review has better instructions than that, search the page for ‘reverse method’.) With the reverse method you’re topstitching on the edge that needs to be sewn down, so you can focus on the topstitching bit, and not the “am I catching the loose edge on the side of the dress I can’t see” bit.
This fabric is (I think) Liberty Mark Tana lawn; I mean, it’s definitely the Mark pattern, I just can’t find a record of this colorway. I’m not usually a navy-blue person (I ended up using all my navy thread sewing this, and had to cheat with a little bit of a blue-purple in places). I figured this would be a good test run for whether this fabric works in Tana lawn, because I really like the print and it is SO BUSY that any little bobbles would be hidden, a kind of Where’s Waldo, but for sewing mistakes. It is also still kind of coldish here so I can wear this over a long-sleeved black tee and leggings. (Mixing navy and black is how you can tell the real fashion pros from the wannabees, right?)
On the easy-to-wear scale, where 10 is “pajamas you’ve had for >5 years” and 0 is “actual suit of armor” this is a solid 7. It hangs nicely, there’s good arm mobility with sleeve bands, the pockets are well-placed and ample, and the fit is trim without being constricting.
I won’t kid you—any shirtdress pattern is just going to be a lot of work. This one has a lot of pieces, and buttonholes, and interfacing, and a collar and and and … it’s definitely a “one bite at a time” pattern and not a “cut out Saturday morning, wear it Saturday night” pattern. I tried keeping track of how long it took me to complete each stage, and I’m pretty sure this was a 5-8 hour sew (for comparison, a dress like this is usually a 3-4 hour sew). Plus I generally like to approach buttonholes well-rested, after a light stretching session, and properly caffeinated ….
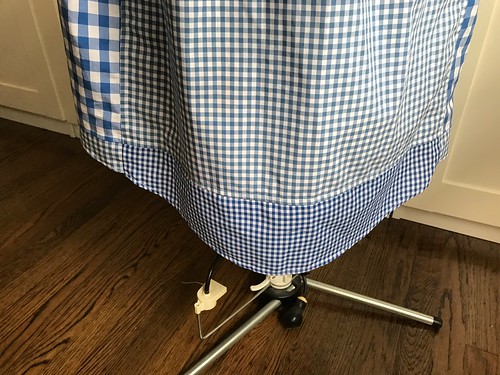
You might notice a new background to the pics—I’m now nicely settled in to my new sewing space! That’s a new dress form, too (her name is Dot, for obvious reasons). My previous dress form (RIP) was bought in the last century and succumbed to terminal foam-disintegration disease. That white drawer-thingy next to the dress in the first picture? That’s full of bias tape. Full, I tell you. (It’s not a problem, I’m sure I’ll use it all up before I die …)
Stay tuned for more Matildas, perhaps an Isca, and a vintage shirtdress! Really!
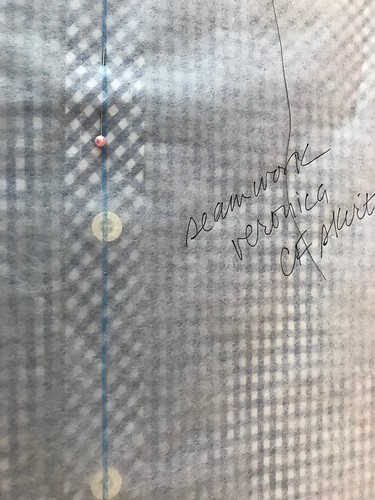
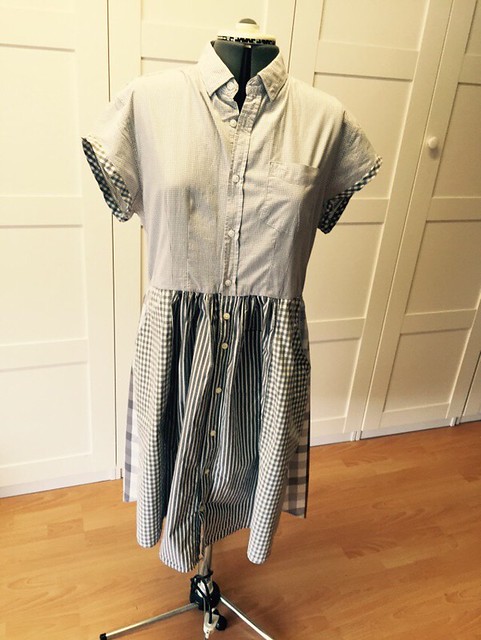
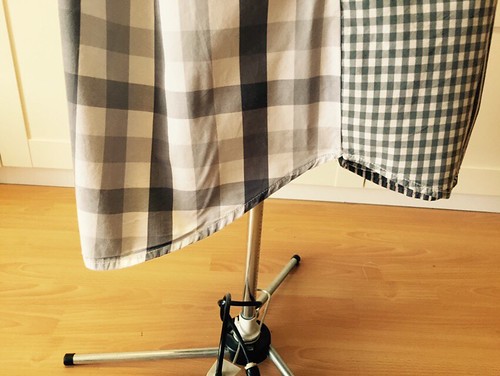
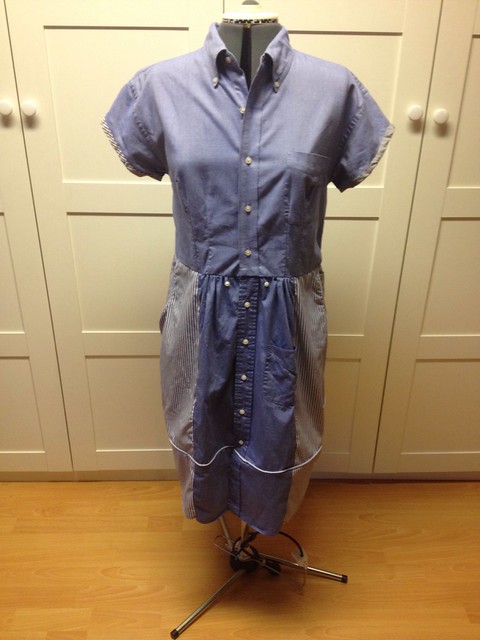
I started this time with (again) the Seamwork Veronica, because it’s easy to make and to wear, and the panel version (for subscribers) is a perfect target for weirdnesses such as this:
This particular dress is made out of (I think) four men’s shirts of varying gingham and stripe patterns (I tried really hard to find all different ginghams but ended up with the stripes, which I think worked out okay).
I thought about trying to cut the waistband so that it too would unbutton, but the placket width was slightly off (and I was more than slightly lazy).
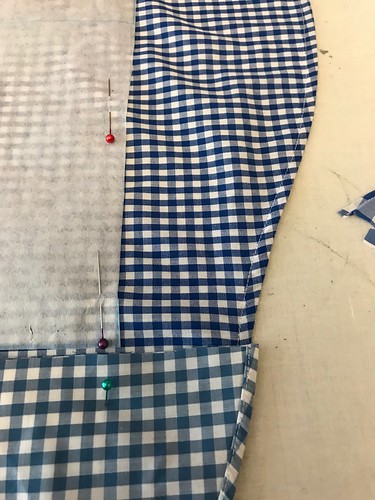
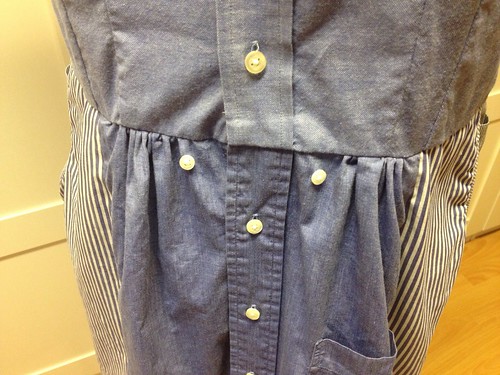
But I remembered to take construction pictures this time! So here’s how I cut out that center front skirt panel from the front of a shirt—I extended the front panel to include the curved hem.
Here’s a closeup:
Basically, I created a new pattern piece for the full center front panel (since it’s too hard to put buttons on the fold) and drew a line to mark the CF, which I could then line up over the center of the buttons in the shirt. (I did the same for the CF bodice and CB bodice & skirt pieces [not pictured]).
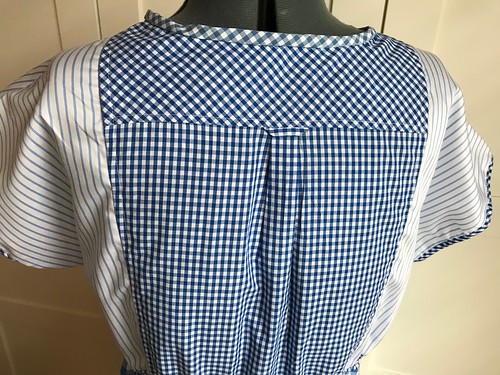
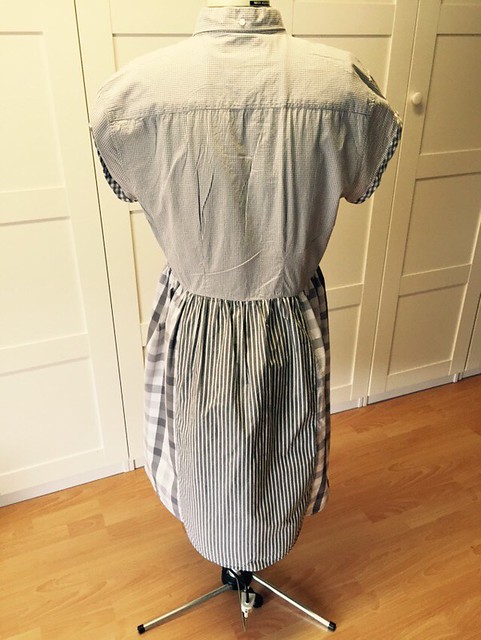
For the CB, I was able to keep the locker loop and yoke, which I always like (but not enough to go out of my way to sew myself, oh no):
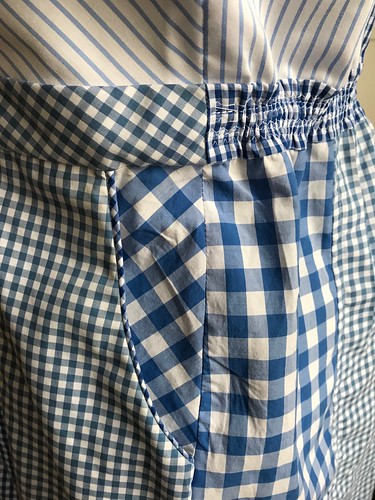
The pocket backing is cut on the bias from the sleeve (men’s shirt sleeves have a lot of fabric in them):
Here it is, constructed:
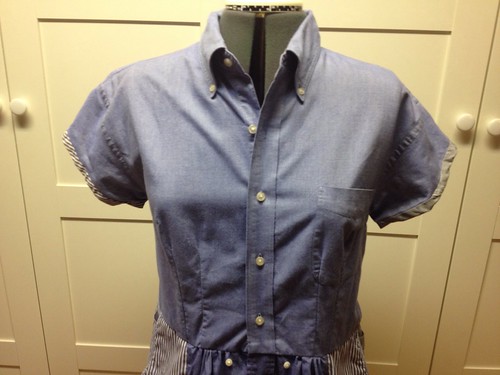
A little in-progress view of the bodice:
This is right after I resewed the front pocket to overlap the side bodice piece — I usually use washaway tape to hold the pocket in place while I sew, because otherwise things go badly.
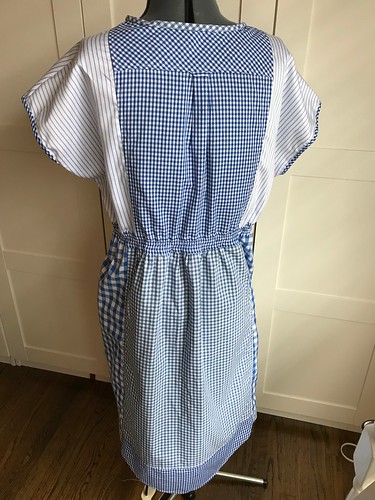
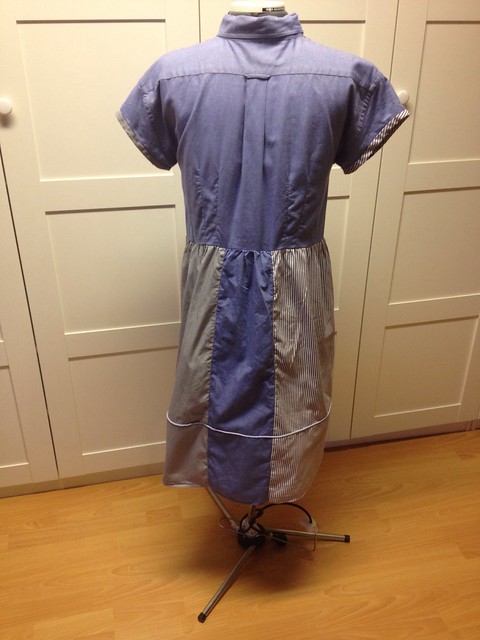
Here’s the full back view:
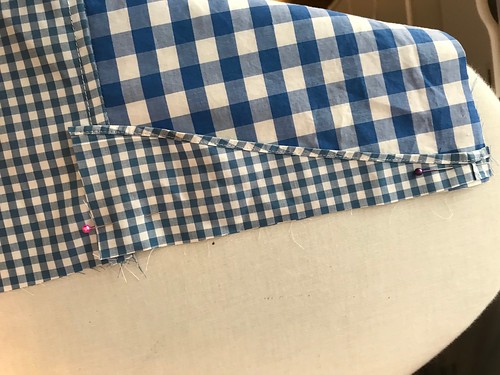
You can almost see that there’s a shirttail hem on the back, to mimic the one on the front—here’s a closer photo of that:
And the piecing of that, since I couldn’t get the curved hems on the shirts to match up well with the pieces I was cutting. (I actually like how this turned out better …)
I just took the curved hem bits I had left over and eyeballed how they should match the front skirt, like so:
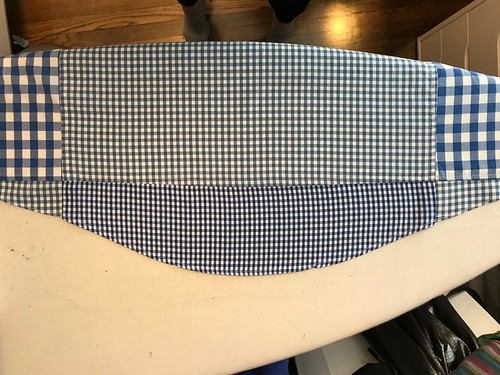
Then it was just a matter of making sure I had seam allowance on the other side, too:
Finished result:
Unless you already have a lot of old men’s shirts lying around, making a shirtdress out of shirts is not that much less expensive than buying yardage (at least not in SF, where a decent shirt at a thrift store will cost you $5-9, depending on condition and whether or not it’s on 50% off sale that day). It takes 4-5 L or XL shirts for one dress, and I try to limit myself to shirts that are unwearable as shirts when I can—ones with stained cuffs, frayed collars, or minor holes that I can work around. I hear tell there’s a Goodwill warehouse in Burlingame that has a ‘pay-by-the-pound’ sale, but I haven’t gone yet—if you’ve gone, feel free to leave your report in the comments!
I want to make a version that is all different flannel plaids for fall, but finding coordinating flannel plaids on intermittent thrift-store trips is a loooooooong project. (It’d would also be fun to make one in Hawaiian-shirt prints, or one in novelty prints … )
I finally found the right old shirt to complete this particular shirt-shirtdress:
I’ve made this particular … can’t really call it a pattern; let’s call it an agglomeration, okay? twice before. (This one I blogged about.)
Here’s the back:
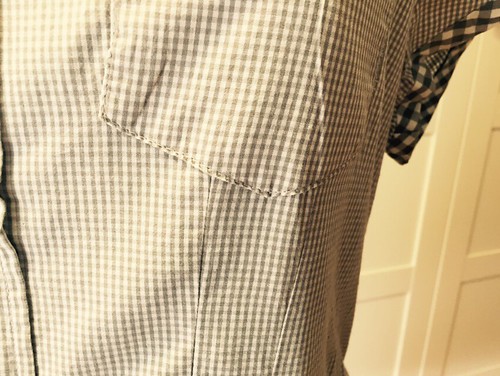
I made the back panel wider this go-around, and used the same shirt for the back side and pocket panels (and you can see that there are three different sizes/shades of gray gingham here, and no, I didn’t match any of them):
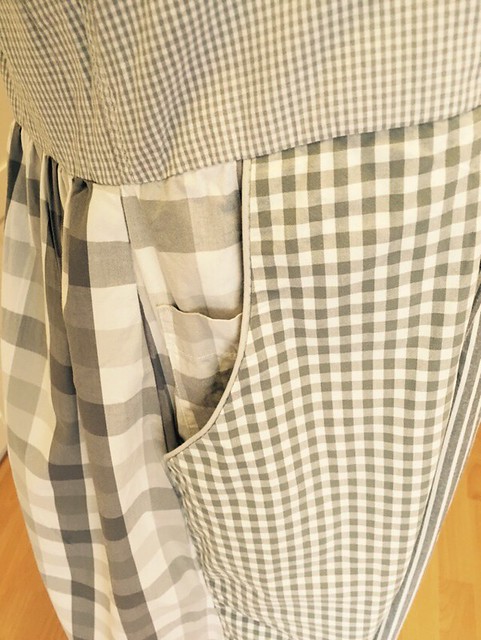
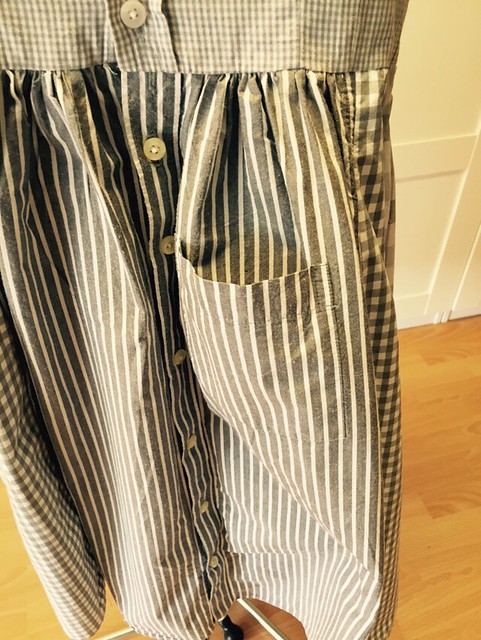
My favorite, favorite part of this dress is putting the front shirt pocket as the pocket panel. For some reason this just pleases me all out of proportion to how much use that little pocket will actually get. But EVEN MY POCKETS HAVE POCKETS, y’all.
I also like making sure the front center skirt piece has a pocket in it. I have put back otherwise lovely shirts at Goodwill if they lack this essential element:
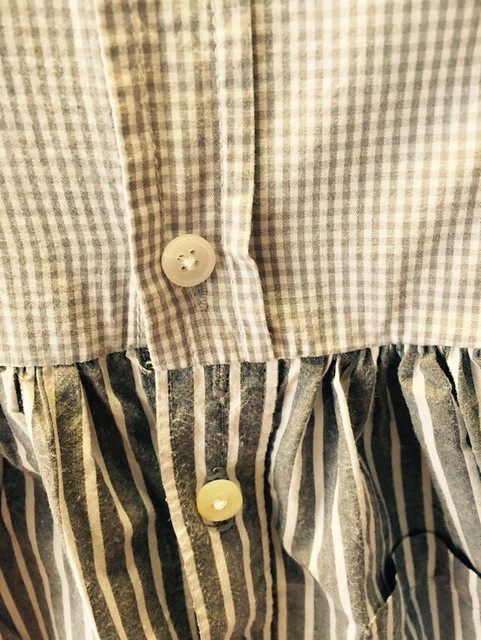
The piping above isn’t made from shirts, it’s some bought-in-NYC Japanese piping I had left over from a gray chambray Simplicity 2389 that I don’t think I’ve posted about yet. Anyway, back to the matter at hand. The buttonholes didn’t really line up well at the center front (you can see here how one buttonhole is actually caught in the waist seam) so I just made a new one (that’s the second buttonhole down). No worries.
My second-favorite bit of making these shirt-shirtdresses is unpicking the front pocket, sewing the darts, then sewing the pocket back down over the darts. Which you can’t really tell from this picture, but that’s what I did:
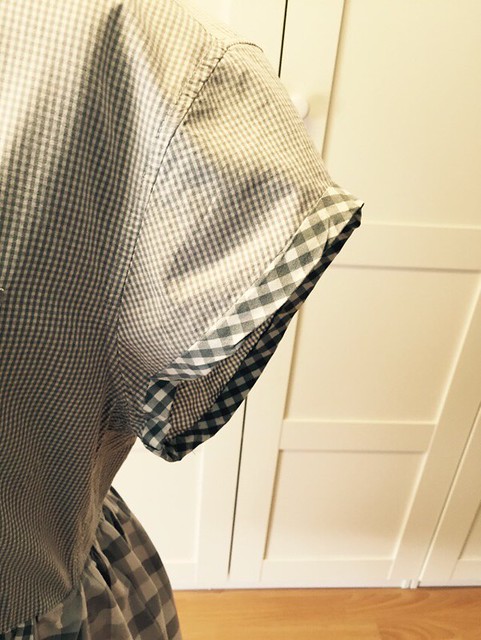
Matching the shirttail hem is also very satisfying — especially at the sides:
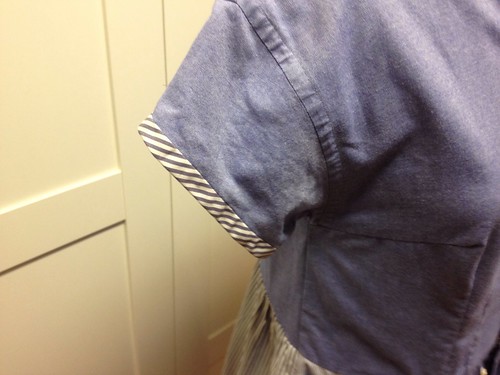
And, of course, using some of the shirt fabric to make bias tape to finish the sleeves:
(The sleeve opening is actually a bit too wide here — next time I’m going to see if I can actually shorten the sleeve and gather it into the sleeve cuff from a different shirt. We’ll see if I can find some XXL shirt with big cuffs to go around my biceps …)
Fabric-wise, this dress took 2 extra-large, 1 large, and 1 medium shirt (for the bodice). The extra-large shirts really make it easier to match up the side panel hem curves without having to use part of the sleeve underarm (never the best part of a secondhand shirt!) at the top of the skirt side panels.
I have one more of these cut out (in different shades/sizes of *blue* gingham) and I hope to take some construction pictures to roll up into an eventual tutorial … these are really not hard to make. (The hardest part is finding the coordinating shirts.)
So as you all already know, I love shirtdresses. Love ’em. Buy tons of shirtdress patterns! Which then languish, mostly unmade, in my sewing lair.
Because, as it turns out, I love shirtdresses, and I really really love shirting fabric, but I am not really enthused about:
sewing buttonholes
making plackets
creating collar stands
So a while back I saw a really cute project where someone (uh, Martha Stewart) had used an old men’s shirt to make a dress for a little girl, and I thought, “Hey, what about …”
Behold, a shirtdress made of old men’s shirts. Here’s the bodice, which uses the collar and placket and sleeves of a man’s shirt.
I kept the collar buttons for the center skirt piece, because: why not?
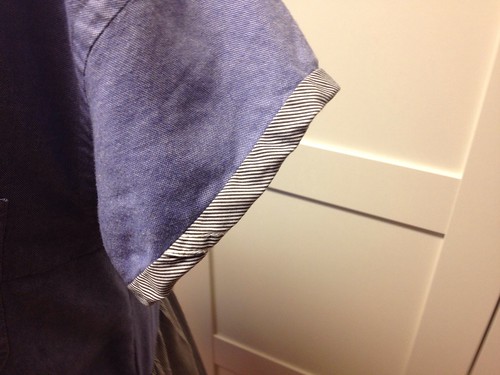
The sleeves are bound in bias tape made from (you guessed it) shirts.
Different bindings for each sleeve. Note the visible french seam here in the bias binding, I really liked it.
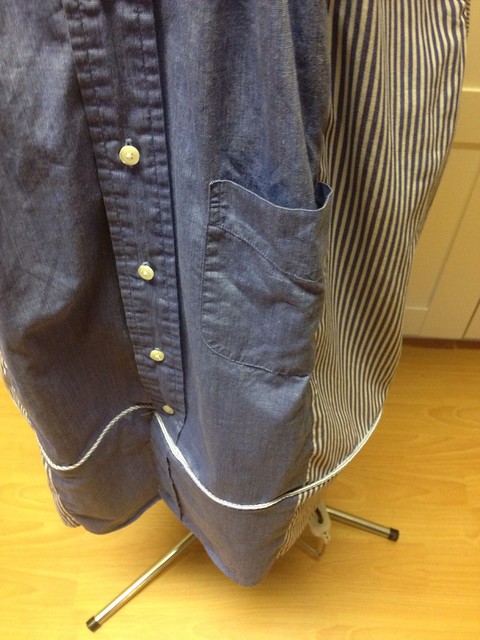
The skirt is an adapted BurdaStyle Heidi skirt! And as you know, I think you can never have enough pockets:
I originally made this too long, but I really liked the effect of keeping the shirt-tail hem as the “skirt-tail” hem. So I just cut the hem off, then reattached it with more “made from a shirt” piping. (I very rarely meet a seam that is not improved by piping.)
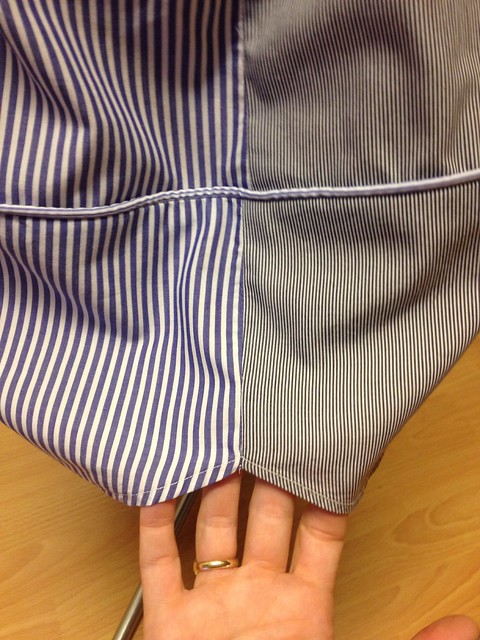
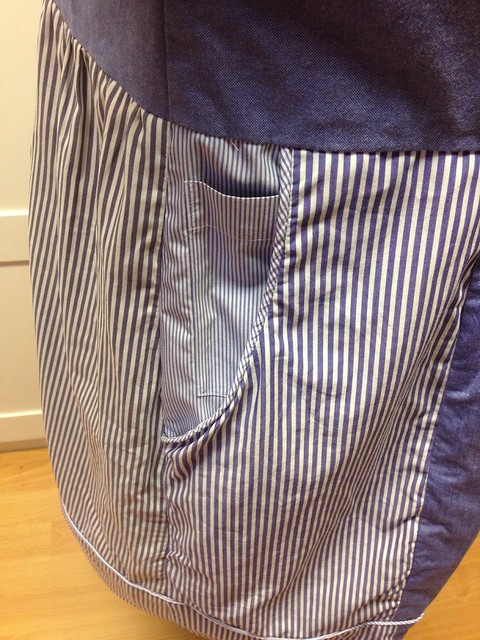
Here you can see the color-blocking of the different shirting patterns, and the SECRET POCKET inside the pocket.
Each pocket has a secret pocket. Oh and I piped the pocket edges with more bias trim made from a shirt, because why not?
Here’s the (inexpertly-ironed, it was late) back view:
I wore the longer version of this last weekend and loved it. SO comfortable and fun to wear (although the previously very long length made it more difficult to walk in, and weirdly made it feel slightly more “Japanese designer” than my usual efforts). Thus the skirt-shortening.
Because I like how this turned out so much, I plan to make another one (or possibly two — I bought a lot of old shirts at Goodwill!) and post a full tutorial. You know, the kind with instructions and pictures and everything. (I have a few tweaks I’d like to try, like maybe doing tucks instead of darts in the bodice and making the skirt fuller with a wider center panel.) This is really ridiculously easy to do, once you have the model of how it should work straight in your head. (The tricky parts to figure out were how to bodice-ize the shirt and how to get the skirt hems to line up nicely.) Everything else is a “simple matter of engineering”, as they say.
Yellow buttons again. I really like yellow buttons.
Towards the end I realized that the buttonholes were going to need more reinforcement than the Liberty Tana lawn was capable of, so I quick-and-dirty basted some silk organza down the front facing:
This dress is five years old, and the bias tape I used to finish the collar was probably about fifty years old, going by the original packaging. So it’s showing its age a bit:
I topstitched the collar, for pretty much no reason:
The funniest thing about this dress: I’m pretty sure I put in that back bodice piece upside down. I just eased it until it worked. Oh well!
I don’t have a full-length back picture of this one, for some reason.


")


 band")